The Linksys BEFSR41 Etherfast Cable/DSL Router
'Instant Broadband' is what it says on the tin, and it does exactly that. The BEFSR41 is a small blue/grey device, just slightly larger than a video cassette. The rear of the
unit has a number of RJ45 sockets that offer a single WAN connection and 4 LAN connections. The front of the unit shows link and activity LEDs for each interface.
The Linksys router is also available in a single or 8-port LAN version.
Connecting to Cable Modem
Connecting the Router ot the modem is as simple as connecting a straight RJ45 cable between the WAN port of the Router and the Cable Modem. By default the Router is
set to get it's WAN ip address from a DHCP server and this works very well with the NTL servers. One issue that may arise if you change an existing PC for the Linksys is that
the Cable Modem will retain the MAC address of the original NIC and it can be troublesome to get the modem to see the Linksys as a new device. Two options are available:
- Power off your CM and after powering back on, allow it to re-sync with the head-end before switching on the Router. Note it may be necessary to leave the modem off
for 4 hours so that your dhcp lease expires, or,
- Configure the Linksys to have the same MAC address as your CM connected PC NIC has. This is known as MAC spoofing or, in Linksys speak, cloning.
Connecting to LAN
By default, the Linksys will have a LAN IP address of 192.168.1.1 and a netmask of 255.255.255.0. This means that unless a PC that is connected to it is set to get an IP
address via DHCP, then it will need setting up with an address on the 192.168.0 subnet. Be aware however, that this address must not be 192.168.1.1, nor must it be in the
range 192.168.1.100 to 192.168.1.149, as this is the default DHCP scope configured on the router. You also cannot use 0 or 255 as the last number.
Again, a straight RJ45 cable is all that is need to connect a PC up to the Linksys. Four ports are available for the LAN side, although five physically exist. The fifth is actually
an uplink port for connecting a hub or switch to the Router. Note that use of the uplink port means that port 1 is not available so in effect you have a 3 port switch in this
scenario.
Theoretically, your Linksys connected network may look like the following diagram, which shows two PCs connected to a CM via a Linksys router. Note that both PCs have
obtained their IP address from the Linksys, which in turn has got it's WAN address from the NTL dhcp server.
In the scenario where you have more than four machines that you want to connect to the Internet, then you will need to attach further network devices to the Linksys so that
the physical limit of the router can be extended. Typically, this is achieved by attaching a hub or switch to the uplink port of the router using a straight RJ45 cable.
Alternatively, you could connect a hub/switch to one of the other router ports using a cross-over cable, but there would not be any real gain in doing this.
PCs connected to the additional hub/switch can still use the dhcp service on the Linksys, and will still be part of the 192.168.1.0 subnet. No configuration changes are needed
on the router for this to work correctly. The following diagram shows how it works in practice:
Integrating with your existing Network
As previously discussed, by default the BEFSR41 is designed to allow up to four PCs to connect to a Cable Modem or ADSL connection, where the WAN IP address is
obtained by dhcp, and the IP addresses for the LAN clients are delivered by the router's own dhcp server range between 192.168.1.100 to 192.168.1.149. If you are moving
from an existing gateway system for instance, your IP addresses may not work very well with the default settings of the router. Of course, if the PCs you already have
networked are already getting their IP address via dhcp, then it should be just a matter of connecting them to the router and obtaining a new address. Note that you may need
to release the old address before attempting to get an address from the router.
Changing the Default Configuration
WARNING. Changing the default settings on your Linksys can reduce the effectiveness of the security offered by the router, and in some instances stop it working all together!
MAC Cloning
Perhaps the first thing you will want to do is to clone the MAC address of the NIC that the Cable Modem has been talking to all this time. The MAC, or Hardware, address of
a particular network device, be it a NIC or a router, is unique, and consists of six hexadecimal numbers. The CM 'learns' this MAC address from the device attached to it, i.e.,
a NIC in a PC and will only talk to that MAC address, until it is reset and has 'forgotten' the original MAC.
Note that it is no longer necessary to clone MAC addresses. If you change from a PC or another router to a Linksys (or any other router) then all you should need to do is power-cycle your cable modem, then power up your new device. I have left the MAC address details in, just in case you decide to do it anyway:-)
- Finding the MAC address that the CM 'learns'
The easiest way of doing this is by using whatever facility your currently connected device has for displaying it's NIC MAC address. Make sure the device is connected to
the CM service and can connect to Internet services. Run whatever utility your system has for showing the MAC address and make a note of it.
- Setting up a PC to access the Linksys Manager
In an ideal world, you do not need to access the Linksys Manager in order to get it operational, but password issues aside, in order to clone your MAC address you have to.
Simply connect a PC to one of the LAN ports of the router, and assuming the PC can lease an address, run a web browser set to use a LAN connection and connect to site
http://192.168.1.1. A successful connection will result in you being asked for the Linksys Manager password. The default settings for this
are Username = nothing, Password = admin. CHANGE THIS PASSWORD!
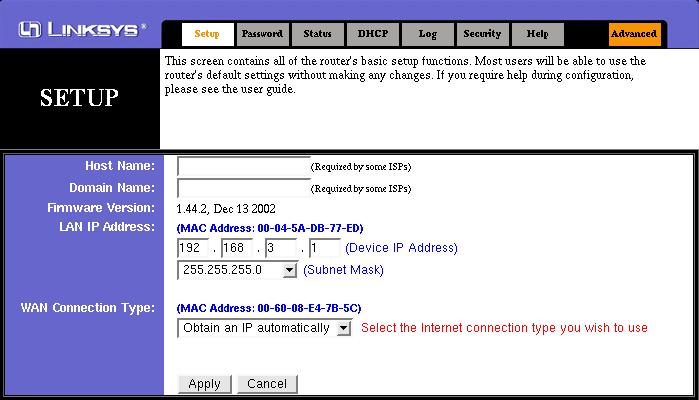
Once connected you will be faced with the general setup interface of the Linksys. For NTL, ensure that 'Obtain an IP automatically' is selected in the WAN Connection Type section, as shown below. There is no requirement to enter either the Host Name or Domain Name.
- Setting the MAC address
The MAC Clone option is accessed via the Advanced configuration option of the Linksys Manager. Click on the Advanced tab, then click on the MAC Addr. Clone tab.
Replace the shown MAC address with the address you got from your original NIC, click Apply, and that should be it. Once you return to the Manager, select the Setup tab
and check the WAN MAC address is displayed correctly.
In my experience with the Linksys, using our internal e-smith provided dhcp server, the Linksys never needs a reboot in order to make changes such as MAC changes, but
with a Cable Modem, I would suggest you power off the Linksys after making this change, just in case.
Changing the Default 192.168.1.0 Network
Set the LAN address of the Linksys by entering the IP address and Subnet Mask on the main setup screen.
Changing the network number you are using from the default set-up by Linksys is only really necessary if you are connecting an existing LAN to it and that LAN does not
use DHCP, or, you just want to be different. It is important to be aware, however, that the Linksys will only support up to a maximum of 253 devices, or, more specifically IP
addresses attached to it and this is enforced by the fact that the minimum netmask you can use is 255.255.255.0. If you are using a 10.0.0.0 network with mask of 255.0.0.0,
then a reconfiguration of the LAN machines will be necessary. Of course, that reconfiguration is quite simple if dhcp is used where a release and renew of the IP lease
is all that would be required.
Note that any change in the Linksys LAN address will also change the Linksys DHCP address, so again a release and renew are necessary to get dhcp machines to get
an address on the new network.
Of course, any machines with manually assigned address will need a manual change to use the new network!
Advanced Configuration
All of these options are available on the Advanced menu.
Port Filtering
Linksys Routers, much like many other LAN sharing options, by default, allow all traffic from LAN to WAN. Port Filtering allows the blocking of particular IP addresses or ports
so that particular Internet applications will not work. For instance, you may decide that you do not want anyone on your LAN using IRC, so you can the 6667 port for IRC
and the Linksys will block that traffic. Note, however, that you cannot set a filter explicitly to an address. Add an address to the Filter IP Range and ALL of it's internet
activity will be blocked, set a port to be blocked and all LAN machines will be denied access to that port.
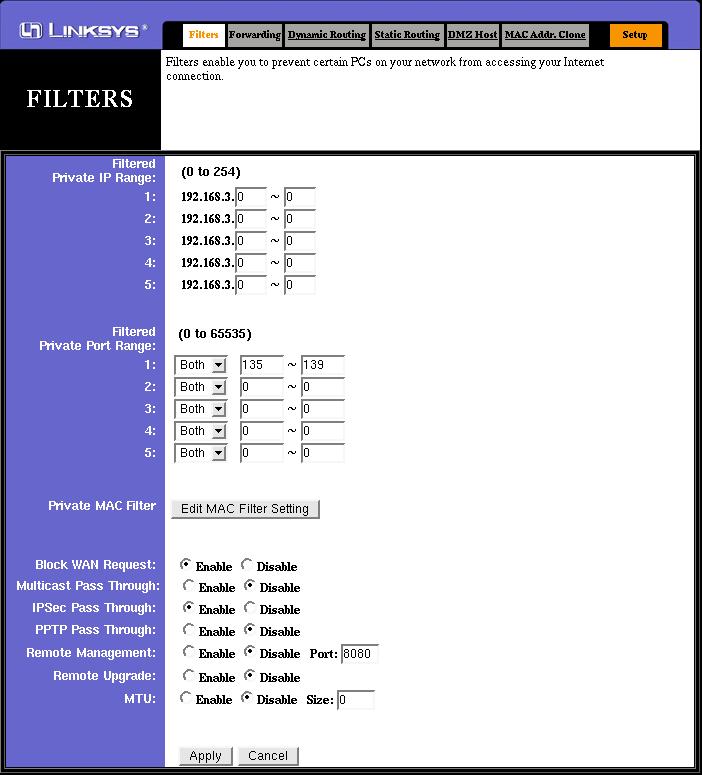
The following screen shot shows filtering set up to block the Microsoft Networking ports. This has no effect on clients connected to the router connecting to each other, but does prevent unwanted connections that could be made outside.
Note also, that this screen also contains the settings for remote access, UPnP, and so on. I would recommend the settings shown for most installations, although this example does show IPSec pass-thru' enabled to allow VPN traffic out via the Internet. Enabling this would only be necessary if required, i.e, if you access work from home.
Forwarding
Forwarding, or Port Forwarding to give it its proper name, is used to set the Linksys firewall rules to allow connections from the WAN, i.e., the Internet, to machines on the
internal LAN. This could be anything for anything from a Web server to an SSH daemon, as long as you know the ports that are required to support the service.
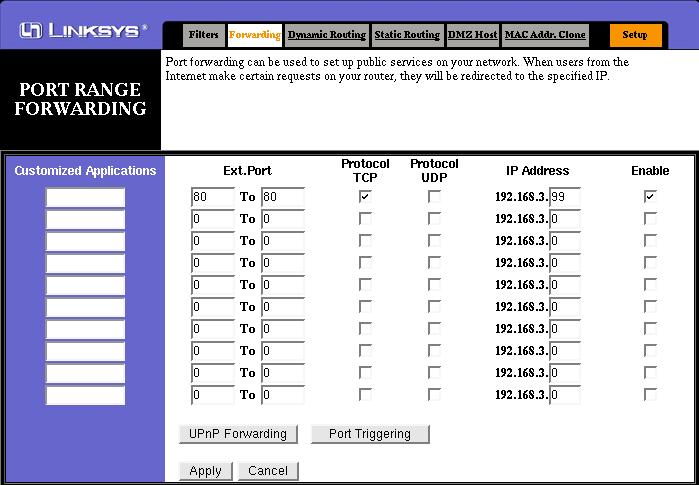
The screenshot below shows port 80 (http) forwarded to an internal machine with IP address 192.168.3.99, which is running an Apache Web Server. Note that the protocol is set to TCP only, and that no UPnP forwarding or port triggering is necessary.
Any clients wishing to connect to the web server must connect to the external IP address of the router, and not the LAN address of the web server. It is also possible to forward your own domain's www address to your NTL assigned address, or you can use one of the many dynamic DNS services, such as
dyndns.org.
DMZ Host
Having a DMZ host takes away what can be a chore setting up individual ports you want to forward for applications discussed earlier. Making a device a DMZ host causes
the Linksys to advertise all of the ports that the DMZ host is advertising. Whilst this can be useful for applications such as Microsoft's Netmeeting, it can also reveal services
such as FTP and Web and File and Print Sharing, which you may or may not want to advertise and I would recommend only using the DMZ facility as a last resort.
Another security issue with the DMZ facility of the Linksys, is that the DMZ host remains as part of the internal LAN, in the same way as machines with forwarded ports,
and can make connections to the other machines on the network. If your DMZ host is compromised, your whole internal network could be as well.
As in the case with a host advertising ports via the forwarding facility of the Linksys, do not make your DMZ host an address that is in the range of the Linksys DHCP service.
Use an address such as 192.168.1.20, or 192.168.1.30 instead.
Security Considerations
The Linksys Router does a very good job of providing a protected connection to the Internet. Once changes are made to the router's default configuration, however, it is
important to remember that whilst NAT is a very good way of stopping direct connections to your LAN machines, it only actually protects you at the TCP/IP level. Applications
such as HTTP or telnet can be exploited and your NAT device will quite happily pass that exploit traffic. As far is it's concerned, if traffic on port 80 is allowed, it can pass.
It has no concern with the content of that traffic, merely the act of making sure that connection from a to b is allowed according to it's NAT tables.
For example, I decide to run a web server on a Linux machine that I have configured as the DMZ host on a router. Unbeknownst to me, this Linux machine also has a Telnet
daemon running, so when the Linksys configuration sets the Linux machine as the DMZ host, it also advertises it's Telnet port. Stupid idiot that I am, my root password is
blank, so if anyone scans my my NTL address for accessible ports, telnet is stting there, wide open and no password. As far as the Linksys is concerned, the telnet traffic
is allowed, it does not know that I neglected to set a password on the host so it allows a connection from anywhere to the DMZ host. As the DMZ host is still on my internal
network, anyone having access to the DMZ host can now start looking for other machines on the network, or even start messing with the Linksys configuration itself. Again,
the Linksys would not be able to tell that the connection it has allowed to the DMZ host is actually about to set up a filter that blocks access to port 80!
It's fairly obvious that Port Forwarding has a distinct advantage over using the DMZ function, as you prevent accidentally leaking services. It is important to remember, tho',
that just having a single port, for http say, as opposed to the whole lot, is not the end of the story. Exploits on running services are probably the main method of gaining
access to other systems so it is important that any services run are ran in such way as to prevent accidental system access. It is also recommended that you also install a
software firewall, such as ZoneAlarm or Tiny Personal Firewall, or at the least an intrusion detection program such as BlackIce, on the host you are forwarding to. For Linux
hosts, I would recommend running your chains or tables as if you were actually connected to the Internet, especially, if you place your Linux host as the DMZ host. Of
course, this is all irrelevant if your system is compromised, but at least an attempt at prevention is better than the cure, IMO.
- Ensure your OS is patched
Nothing more embarrassing than getting hit by an attack that could have been prevented by applying a patch that was released two years ago. This does not necessarily
mean that you should apply patches as soon as they are released, however, as some patches may introduce new problems as well as fixing old ones!. Consult the support
websites and forums for your system to establish that patch what is required as opposed to what there is.
- Ensure the service is patched
Same applies as above. Also consider whether there are any settings that can be set. or even utilities that can be employed that can prevent unwanted egress into your
network. For instance, with SSH, you could configure it so that only known host keys can connect, or with Microsoft's IIS use IISLock to disable unwanted services within
IIS itself.
- Employ Firewall or IDS
On the face, of it, a waste of effort as in order to run your service, you have to open the ports for the service in the firewall anyway! There are also tools available that will
disable software firewalls possibly making them doubly superfluous. Use of some firewalls can be useful, however, if they are able to block unwanted access going out of
your host to other hosts on your network. If you have to use a DMZ host (such as for Netmeeting), then ensure that only the ports for the application are opened, and not all.
With your other LAN hosts, use a different software firewall to that used on the DMZ host as well. Note, however, there is little protection that you can apply to the Linksys
to prevent tampering once your service host is compromised apart from ensuring your password is suitably strong.
- Employ Up to Date AntiVirus
If you use an MS host for port forwarding or DMZ host, AV software will prevent Trojans being installed that could be used against your other LAN hosts. Also use AV on your
other MS machines.
©
Nig's Net Written using the Bluefish HTML Editor on RedHat 9.0.
All Copyrights and Trademarks ACK'd. Not to do so would be a SYN!

 In Microsoft parlance, the MAC address is displayed as the Adapter Address, but is the same thing.